Test execution
Launch Examples
Test cases can be run with supplying of py.test options:
- All standard py.test options can be used for performing test cases.
- General TAF specific options.
- Additional ons-specific options.
- Options provided by plugins.
It’s easy to get all the information with short description using the command shown below:
$ py.test --help
General Options:
These options have to be registered in top level conftest.py file and they are checked by testlib modules.
--env=ENV |
setting environment option, identify devices, ‘None’ by default |
--setup_file=SETUP |
environment setup option, define environment configurations, ‘sim_lxc_simplified.json’ by default |
--loglevel=LOGLEVEL |
logging level, print logging to console. ‘INFO’ by default |
--logfile=LOGFILE |
logging file, store logs into file. ‘None’ by default |
--silent |
do not print logging to console. Default - Disabled |
--get_only |
do not start environment, only connect to exists one. False by default |
--leave_on |
do not shutdown environment after the end of tests. False by default |
--use_parallel_init |
threads for simultaneous devices processing. False by default |
Note
option –setup_file are obligatory
Additional Options:
These options are described and analyzed in top level conftest.py files.
--setup_scope=SETUP_SCOPE |
setup scope, select from ‘session’, ‘module’, ‘class’, ‘function’. ‘module’ by default |
--call_check=CALL_CHECK |
check method for devices on test case call (none|complete|fast|sanity_check_only) ‘fast’ by default |
--teardown_check=TEARDOWN_CHECK |
check method for devices on test case teardown (none|complete|fast|sanity_check_only) ‘sanity_check_only’ by default |
ONS-specific Options:
This options are analyzed in ONS specific teslib modules (e.g. switches module).
--fail_ctrl=FAIL_CTRL |
action on device failure (stop|restart|ignore). ‘restart’ by default |
--build_path |
BUILD_PATH Path to build, ‘/opt/simswitch’ by default |
--testenv |
{none, simplified2, simplified3, simplified4, simplified5, golden, diamond, mixed} Verify environment before starting tests (none | simplified2 | simplified3 | simplified4 | simplified2 | golden | diamond | mixed) ‘none’ by default |
Plugin Options:
These options are provided by plugins.
--pidcheck_disable |
disable pid check for test |
--log_storage |
{none, host, tms, both} where to store run logs (none | host | tms | both) |
--log_type |
{Failed, All} what kind of tests logs to store (Failed | All). ‘Failed’ by default |
--log_enable |
{False, True} enable/disable log tool for test (False | True). False by default |
You can execute the test cases using the following command:
/<host>/:~ /testcases$ sudo env PYTHONPATH=~taf/taf py.test --env=config/env/environment_examples.jso --setup=config/setup/rr_simplified.json general/test_switch.py -m sanity --logdir=demo_logs --xml_html=demo.html
env PYTHONPATH |
set up PYTHONPATH variable |
env |
provide path to the environment*.json file |
setup |
provide path to the setup*.json file |
Test cases with traffic generators
Traffic generator is necessary to transmit and receive network traffic packets through the switch systems.
For the first you need to install 3rd party packages for Traffic Generator.
Installing 3rd party packages for IXIA traffic generator
IxTclHal API
TAF might require an IXIA TCL hal library and Python bindings for Tcl available in the Tkinter library depending on test scenarios. Ixia is one of traffic generators which generate traffic, or monitor the traffic transmitted by peers such as a switch. The latest Ixia software can be downloaded from Ixia website with eligible account.
Install Python Tk library:
$ sudo apt-get install python-tk
Get the IxOS binary (version X.XX) and install it (into /opt folder):
$ chmod +x ixosX.XX.XXX.XLinux.bin
$ sudo ./ixosX.XX.XXX.XLinux.bin
- Select Tcl version: Tcl8.4
- Choose install folder: /opt/ixos
Add symlink to /opt/ixos/lib/ixTcl1.0 directory into /usr/share/tcltk/tcl8.4/:
$ sudo ln -s /opt/ixos/lib/ixTcl1.0 /usr/share/tcltk/tcl8.4/
Check if IXIA library was installed properly:
$ env IXIA_VERSION=X.XX tclsh
% package req IxTclHal
Tcl Client is running Ixia Software version: X.XX
X.XX
Note
Add “export IXIA_VERSION=X.XX” to your /etc/profile if necessary
Possible issues:
- Can’t create directory /opt/ixos/Logs. Permission denied - create necessary directories manually with sudo:
$ sudo mkdir /opt/ixos/Logs && sudo mkdir /opt/ixos/Results
- In case you’re getting ‘Segmentation fault’ error - reinstall Tcl:
$ sudo apt-get purge tcl8.4
$ sudo apt-get install tcl
IxNetwork and HLTAPI
New (IxNetwork) API requires additional steps to be performed, as described in this section.
Install IxNetwork Tcl Client
Get the IxOS binary (version X.XX or better X.XX) and Install it:
$ chmod +x IxNetworkTclClientX.X.XXX.XXLinux.bin
$ sudo ./IxNetworkTclClientX.X.XXX.XXLinux.bin
Note
Install the client software where IxOS is already installed!
IxNetwork adds environment variables into /etc/profile, so reload profiles:
$ source /etc/profile && source ~/.bashrc
How to check that IxNetwork Tcl Client has been installed properly:
$ /opt/ixos/bin/ixnetwish
% package req ix_tc
3.20
% package req tbcload
1.4
% package req Thread
2.6.5
%
Configure HLTAPI
Install additional tcl pckages:
$ sudo apt-get install tcl8.4 tclx8.4
Note
HLTAPI can work properly only under tcl8.4
Check if configuration is correct:
$ env IXIA_VERSION=X.XX tclsh
% package req Ixia
Tcl X.X is installed on 64bit architecture.
Using products based on HLTSET138
Tcl Client is running Ixia Software version: X.XX
Loaded IxTclHal X.XX
Loaded IxTclServices X.XX
Loaded IxTclProtocol X.XX.XXX.XX
Loaded IxTclNetwork X.X.XXX.XX
HLT release X.XX.X.XXX
Loaded ixia_hl_lib-X.X
X.XX
%
IxLoad
Install IxLoad libraries to the same location with IxTclClient:
$ chmod +x IxLoadTclApiX.XX.XX.XLinux.bin
$ sudo ./IxLoadTclApiX.XX.XX.XLinux.bin
$ source /etc/profile && source ~/.bashrc
Check if IxLoad installed correctly:
$ env IXIA_VERSION=X.XX tclsh
% package req IxLoad
Tcl Client is running Ixia Software version: X.XX
X.XX.XX.X
Installing 3rd party packages for TRex traffic generator
TAF and TRex control plane

Download and installation TRex server
Check environment:
hardware recommendation
supported Linux versions:
- Fedora 18-21, 64-bit kernel (not 32-bit)
- Ubuntu 16.04 LTS, 64-bit kernel (not 32-bit)
Obtain the TRex package. Latest release:
$ mkdir trex
$ cd trex
$ wget --no-cache http://trex-tgn.cisco.com/trex/release/latest
$ tar -xzvf latest
To obtain a specific version(X.XX=Version number):
$ wget --no-cache http://trex-tgn.cisco.com/trex/release/vX.XX.tar.gz
Run TRex server
- Identify the ports:
$ cd trex
$ sudo ./dpdk_setup_ports.py –s
Create simple configuration file:
- Copy a basic configuration file from cfg folder:
$ cp cfg/simple_cfg.yaml /etc/trex_cfg.yaml- Edit the configuration file:
$ vim  /etc/trex_cfg.yaml
port_limit      : 2         # this option can limit the number of port of the platform
version         : 2
interfaces      : ["03:00.0","03:00.1"] #the interfaces using ./dpdk_setup_ports.py –s
Run TRex for the first time:
Use the following command to begin operation of a 2x10Gb/sec TRex:
$ sudo ./t-rex-64 -i -c 2 –cfg /etc/ trex_cfg.yaml
Download and installation Client Machine
Obtain the TRex client package:
Latest release:
$ mkdir trex_client
$ cd trex_client
$ wget --no-cache http://trex-tgn.cisco.com/trex/release/latest
$ tar -xzvf latest
$ cd vX.XX
# X.XX=Version number
$ tar -xzvf trex_client_v2.03.tar.gz
Clone TAF and TCs repositories:
$ git clone https://github.com/taf3/taf.git
$ git clone https://github.com/taf3/testcases.git
- Create setup file and update env file based on diagram bellow:
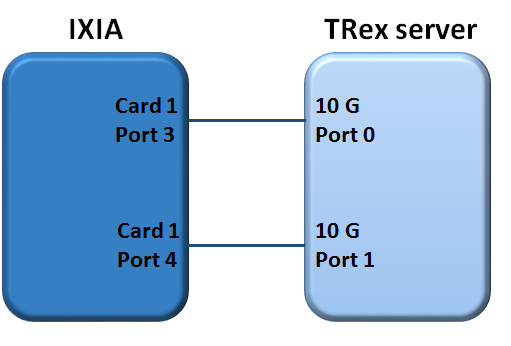
TRex config in ENV JSON file:
1 | {"name": "TRex", "entry_type": "tg", "instance_type": "trex", "id": "1001", "ipaddr": "X.X.X.X", "ssh_user": "", "ssh_pass": "", "ports": [0, 1]}
|
TRex setup file:
1 2 3 4 5 | {"env": [
{"id": "02", "port_list": [[[1, 1, 3], 10000], [[1, 1, 4], 10000]]},
{"id": "1001"},
{"id": "5", "related_id": ["02", "1001"]}],
"cross": { "5": [["02",1,"1001",1], ["02",2,"1001",2]] }}
|
Traffic Generator attributes and methods
All traffic generator objects have to be child of interface class testlib::tg_template::GenericTG.
Please read reference above for all available methods.
Note
Support of some methods could be unavailable in some tg types
Sniffing
Usage example:
1 2 3 4 5 6 | tg_ports = [ports[('tg1', 'sw1')][1], ports[('tg1', 'sw1')][2]]
env.tg[1].start_sniff(tg_ports, sniffing_time=10, filter_layer="STP")
#...
# Other steps in case
#...
data = env.tg[1].stop_sniff(tg_ports)
|
Description/Features
- Sniffing is performed in background.
- Stop_sniff() can be called separately for each port.
- Real packets capturing could be started with some delay. We found that different sniffer types don’t start capturing right after receiving the command but with some delay. Based on experience this delay is set to 1.5 seconds. Therefore additional time sleep 1.5 seconds is introduced in start_sniff method, which are included in sniffing_time. You have to take this in to account and don’t use sniffing time less then 3 seconds (5 is recommended). For benchmarking test cases you have to use special environment like IxNetwork or IxLoad.
- You can stop sniffers immediately using force=True parameter. By default stop_sniff returns control only after sniffing_time is elapsed.
Full methods references
- testlib::tg_template::GenericTG::start_sniff
- testlib::tg_template::GenericTG::stop_sniff
Packets filtering
You can check list of run-time filter layers in tg object attribute flt_patterns (testlib::packet_processor::PacketProcessor::flt_patterns).
If you need more complicated filter condition you should use post processing:
1 2 3 4 | lfilter = lambda x: x.haslayer("STP") and x.get_lfield("STP", "rootid") == 4096
data1 = {}
for key in data.keys():
data1[key] = filter(lfilter, data[key])
|
This filter returns the selection of STP BPDU packets with the rootid field equal to 4096.
Using comprehensive lists, the previous example becomes:
1 2 | lfilter = lambda x: x.haslayer("STP") and x.get_lfield("STP", "rootid") == 4096
data1 = dict((key, filter(lfilter, data[key])) for key in data.keys())
|
Sending Packets
Trivial Packet Sending
Method send_stream() returns control after packet sending is finished:
1 2 3 | tg_port = ports[('tg1', 'sw1')][1]
stream_id = env.tg[1].set_stream(packet_definition, count=5, inter=2, iface=tg_port)
env.tg[1].send_stream(stream_id)
|
Note
You should define streams at the beginning of the test case if possible. Then in steps, use only the send_stream method. This manner of packet sending improves test case performance as far as setting stream takes additional time for execution
Threaded Packet Sending
Method start_streams() returns control immediately after call. Packets will be sent in the background:
1 2 3 4 5 6 7 8 | tg_port = ports[('tg1', 'sw1')][1]
stream_id_1 = env.tg[1].set_stream(packet_definition_1, count=5, inter=2, iface=tg_port)
stream_id_2 = env.tg[1].set_stream(packet_definition_2, count=15, inter=1, iface=tg_port)
env.tg[1].start_streams([stream_id_1, stream_id_2, ])
#...
# Some staff
#...
env.tg[1].stop_streams([stream_id_1, stream_id_2, ])
|
Warning
If you’ll try to start another stream without stopping the previous one, the first streams will be re-started. This behavior depends on TG type. Don’t use it as a feature
The set_stream() method has several parameters that allow you to build a packet stream with incremented parameters.
Full methods references
- testlib::tg_template::GenericTG::set_stream
- testlib::tg_template::GenericTG::send_stream
- testlib::tg_template::GenericTG::start_streams
- testlib::tg_template::GenericTG::stop_streams
Working with Packets
Traffic Generator objects include set of methods to work with packets (please see testlib::packet_processor::PacketProcessor). But you also can access packet fields directly using internal packet’s methods.
Get Packet Field
- TG method
- testlib::packet_processor::PacketProcessor::get_packet_field()
Get Packet Layer in Necessary Format
- TG method
- testlib::packet_processor::PacketProcessor::get_packet_layer()
Check packet field value
- TG method
- testlib::packet_processor::PacketProcessor::check_packet_field()
- testlib::packet_processor::PacketProcessor::check_packet_field_multilayer()
Get packet dictionary
Reverse packet building: pypacker packet to packet dictionary.
- TG method
- testlib::packet_processor::PacketProcessor::packet_dictionary()
Packet fragmenting and assembling
- TG method
- testlib::packet_processor::PacketProcessor::packet_fragment
- testlib::packet_processor::PacketProcessor::assemble_fragmented_packets
Statistics
Traffic Generator object contains number of methods to work with statistics.
- testlib::tg_template::GenericTG::clear_statistics()
- testlib::tg_template::GenericTG::get_sent_frames_count()
- testlib::tg_template::GenericTG::get_received_frames_count()
- testlib::tg_template::GenericTG::get_filtered_frames_count()
- testlib::tg_template::GenericTG::get_uds_3_frames_count()
- testlib::tg_template::GenericTG::get_qos_frames_count()
Note
Different types of TG could don’t have support of some counters. Read appropriate tg type docs
Example of the test case with traffic generator
Sample Test:
1 2 3 4 5 6 7 8 9 10 11 12 13 14 15 16 17 18 19 20 21 22 23 24 25 26 27 28 29 | class TestLinks(object):
def test_links(self, env):
""" Test links between Trex TG and IXIA"""
# Define TGs
ixia = env.tg[1].id
trex = env.tg[2].id
# Define active ports and packet
ports = env.get_ports()
packet_definition = (
{"Ethernet": {"dst": "ff:ff:ff:ff:ff:ff",
"src": "00:00:00:00:00:02"}},
{"IP": {"src": 'X.X.X.X', "dst": 'X.X.X.X'}})
packet_count = 1
# Set traffic stream on TRex
stream_id = env.tg[2]. sey_stream(
packet_definition,
count=packet_count,
iface=ports[(trex, ixia)][1],
adjust_size=True)
# Start sniff on Ixia
env.tg[1].start_sniff([ixia, trex)][1])
# Send packet
env.tg[2].start_streams([stream_id])
time.sleep(1)
# Stop sniff
data = env.tg[1].stop_sniff([ports[(ixia, trex)][1]])
# Verify that packet was received
assert len(data[ports[(ixia, trex)][1]]) == 1
|
Example TAF command line, run in the testcase directory:
$ env PYTHONPATH=../taf/taf:<path to Trex client library /trex_client/stl/ or use $TREX_CLIENT_LIB> py.test --env=config/env/environment_examples.json --setup=config/setup/trex_ixia_simplified.json testcases/test_links.py --loglevel=DEBUG